Sunday, December 9, 2012

A Fraction of a Touch

For my children, especially my oldest, being able to touch and manipulate is key to learning. But how does one teach through touch? The answer is simple. One must get creative.
Photobucket

When we delved into the interesting world of fractions I realized my son learned the most through helping me cook, well then it occurred to me why not use the same tools just for fun! So we did!
We also got some more use out of our rainbow rice.

We used measuring cups and spoons, the rice and an empty bowl to add and subtract fractions. It was great fun!

 Photobucket

Eggciting Eggsplosion

If you have an Angry Bird Fan, or just a kid who likes life a little messy but without getting their own hands dirty here is an activity for you!

What you need:
Plastic Easter eggs
paint (I used poster paints as I was out of tempera )
water
poster board

and for added fun you need a sling shot!
Photobucket


How:

put a small amount of paint in the egg add some water, stir it up and close egg. I used an egg carton to hold the eggs up and keep them from leaking every where.

Photobucket Once you have quite a few, and I recommend at least 24 for 2 kids (otherwise they go through them all in about 5 seconds)

Tack the poster board to a tree or something else that can hold it up and step back. The object is to hit the poster board with the eggs which then splatter all over it and make a pretty pattern.

A sling shot takes more skill and prolongs the fun.

We like to use an old card table flipped over to it's side and tack single sheets of paper to it with points written on them. Makes it trickier and more entertaining.

Photobucket

Tuesday, March 27, 2012

Fraction Action!

Paper plates may not be good for eating off of but they are indispensable materials for art projects.

To help my oldest with fractions I took a bunch of plates and painted them to illustrate different fractions.
I then had him label them.

We used them in a variety of games. Like hopscotch and a version of twister.

I would call out different fractions and actions and he had to follow directions. He had a blast and it really helped him with the concept.
PhotobucketPhotobucket

Now I have to find a way to teach him how to get his socks into the laundry basket... any suggestions?

After he got the wiggles out I taught him how to add fractions using the plates as a visual.

Busy Buzzy Bees

Keeping with the Bug Trend we did a unit on Bees! Now Bee watching had me a little nervous as I am allergic but the kiddlets had a blast. I preferred the indoor bee activities and crafts myself.

You can make a bee from almost anything, and I have learned with my kids they learn better when their hands are busy, so while I teach they work on their crafts.

We made bees from toilet paper tubes, yellow paint, black pipe cleaners and black construction paper. Just cut strips if black paper glued them onto the tubes and painted yellow in between stripes. They then cut little circles and drew buggy faces on them and finally using pipe cleaners to shape antennae and wings. Once the antennae and wings were shaped I poked holes in the tube and twisted the pipe cleaner through the holes.

They also enjoyed painting paper plates into bubble bees. Which I think is pretty self explanatory.
Photobucket

But by far the most fun was had with exploring the goodies we get from bees. We had a honey tasting event and enjoyed yummy peanut butter and honey sandwiches (while watching Magic School Bus in a Beehive).

To cap off the week we made candles from Bees wax.

You need containers, A block of wax, hammer, a heat source and wicks.

Photobucket

The little people had more fun than is healthy breaking up the wax into chunks with the hammer.
Photobucket

We then stuffed the chunks into old baby bottles for heating. We used the microwave and heated them for about 2 minutes.
Photobucket
As you can see they melted beautifully.

Then they poured the wax into glass baby food jars and placed their wicks into the center and allowed them to cool.

Photobucket

They turned out beautifully! Don't forget to trim the wick before lighting.

And if you have left over wax you can make drip candles too...but only if you have very patient kids. Mine ate not.

Buggin' Out (Part II)

Bugs are incredibly cool especially to two little boys. So we have delved into anything and everything bug related.

I found this most AWESOME idea ever! Here for a Bug Catcher necklace. It has become my boys favorite thing. And if you don't have the time or the inclination to make them yourself than the author of Whimsy Love sales them.

All you need: are beads, string or twine (we used hemp), and those little plastic containers you get with toys out of the coin thinga-mu-bops from the grocery store.

punch holes in the top of the container, a bigger hole in the center where you can later thread the necklace through. String some beads on the string tie it off and done Photobucket

once you have a cute little bug catcher you're ready for a bug safari!
Photobucket

This one contains some dirt and a worm... while not exactly a bug still cool to wear around the neck... if you are a five year old boy.

I can't wait for summer to do a pretty Fourth of July necklace and stuff full of Lightening Bugs.

Monday, March 26, 2012

Paint By Bubble

I know crayola has their nifty color bubbles on store shelves now but I prefer making my own. They clean up so much easier and make nicer bubbles.

CIMG3006

I like using baby food jars but you can store them however. Just pour bubbles into jars, add paint, stir and have fun.

Photobucket

Now to take this further, kids can blow the bubbles onto paper and it makes great artwork. I like to use solid white wrapping paper and let the kids wrap their friend's presents in their art :)

Push Around Buggy Detailing

I saw on the web somewhere several months ago about a mom who painted their cozy coup and thought "I have to try this!" So I did!

Here is my Pip's new ride.

Photobucket
CIMG3029

This is a lot easier than it looks. Just plastic spray paint and painter's tape.

But be careful with taping off your lines. Plastic paint seems to be different than regular paint and gets under the tape easier so I had to redo this a few times and triple layer the tape.

NEXT I will be turning his Cozy Coup into the Mystery Machine!

Foaming Finger Paint

Unfortunately I lost my pictures of this activity. They some how got erased before making it onto my computer so the next time we do this I will take extra pictures and post right away. But this has to be one of my kids most favorite activities.

All you need for foamy finger paint fun:
A sense of fun
A high tolerance for mess
Shaving Cream
Tempera Paint
and I suggest a water hose for clean up

On a flat surface, outside- I really highly recommend that this never be done inside... ever - put a small pile of shaving cream let the kids smooth it out. Add a dollop of tempera paint and let them mix the shaving cream and paint. smooth it on the surface and the kids can practice writing with their finger... of course that is only after they have gotten done smacking the paint and watching it fly everywhere.

This is a lot of fun for everyone, even older kids. The Little Man even loves to do his spelling words this way. And there is even a scientific reason this is so wonderful ... but that doesn't matter. Even if it didn't promote learning this is just too much fun not to do!

Splash of Color

No matter what it is that we are studying colors always make it more fun and more memorable.

Middle man is working hard to catch up to his big brother's reading level so we needed some fun new ways to approach the alphabet.

We took good quality paper made for watercolors, painters tape and lots of paint and had fun making letters that we later made into a word game - CIMG3008

This is very simple and fun. Use the painters tape to make letters. Then paint the entire sheet of paper. To make it fancier you can make little decides around the letters as well.

Photobucket

Once it is dry remove the tape and Tada! Photobucket

Tuesday, March 13, 2012

Buggin' out! (Part I)

This week we are Buggin' out for bugs! This is probably one of my favorite thing about being a mom to boys. Creepy, crawly, slimy and icky are all words synonymous with AWESOME!

We started off reading a very cute book called "The Very Ugly Bug" It is a sweet story about an Ugly bug who discovers how special she is and lives happily ever after. This was a great opener to the concepts of adaptations and evolution.

We spent a large amount of time discussing the different bugs and animals we know and identifying what special adaptations they have.

We then talked about the Peppered Moths and watched this video: Evolution of the Peppered Moth

I made pipe cleaner moths ( or Butterflies ) using different colors to demonstrate how the process works.

Each boy made their own moth. Though they decided to call them butterflies.
Photobucket

We finished up the day discussing camouflage and painting bug masks.

we got plain white masks from the craft store and used Acrylic paints.

after the masks dried we wore them and pretended to be bugs. They boys made up stories and facts about their "bug"

Photobucket


Responsibility Reminder

I don't like the name "Chore Chart" and think Responsibility Reminder is more accurate. The boys complained recently that they don't know what is expected of them so I thought a reminder they could look and interact with would be a big help. I wanted something cute but I'm cheap so that kind of limited what we could do.

This is what I ended up doing.

I used cork boards from Wal-Mart (2 x 2.97$)
Scrap book paper ( .20$)
Stickers (2 x 1.99)
Ribbon (1.00$)

along with thumb tacks, foam letter stickers, and a hot glue gun.

I cut scrap book paper into shapes and used the stickers to decorate and lable their responsibilities.
I glued the ribbon onto the board as decoration and then more ribbon the top for hanging.
when all that dried I used Thumb tacks to attach the shapes.

and this was the finished product.
Photobucket

So far it seems to be really helpful and the kids like taking off their shapes when they finish a task.

Rainbow in a Box

Photobucket

I ran across the idea on a blog here and automatically thought "WE HAVE TO DO THIS!" Typically we buy the Crayola colored sand which cost about 7$ for 5 lbs and it makes a mess inside and we can only really use it in the fall because in the summer the sand gets too hot and in the spring, there's just too much pollen. So this really was the best solution ever.. AND it was cheaper!

What you need:
10 lbs bag of rice
ziploc bags
food coloring
alcohol
tub or table for finished product and a decent broom for clean up.

Photobucket

The kiddos used a plastic cup to divide the rice into plastic bags. Then added several drops of food coloring. Mixing some colors to make others. They then added a splash of Alcohol and shook the bags.
Photobucket
I then took over as rice ended up all over the floor. I massaged the coloring and alcohol into the rice and once all was done we poured it into the Sand and Water Table. Once the rice had a chance to dry we brought the whole thing inside.
Photobucket
This made an excellent place for practicing spelling and later was the perfect stage for Clone Troopers to have an ambush.

Thursday, March 8, 2012

Fossil Fun

While reading about how the Earth Changes we read about Fossils. Well what better way to understand how fossils are formed than to make our own?!

What you need:

2 cups flour
1 cup salt
2 cups water
and stuff from outside

Preheat oven to 200 degrees

Mix flour and salt in bowl and slowly add water. Stir until Smooth.

Plop portion onto baking pan. Collect odds and ends and place into dough.

Bake for 45 minutes to an hour. You can cover with glaze afterwards if you would like.

PhotobucketPhotobucketPhotobucket

Journey to the center of a Volcano

Still working our way through the wonderful world of volcanoes and it is amazing how many experiments and projects that are out there on the subject.

Here are a few that we found the most entertaining:

Cake Batter Lava
You need: volcano, army men, cake batter, ruler,

The original instructions on this said to use regular cake batter and add only water, well I didn't want to waste the chance to make cake so I went ahead and mixed the batter like I normally would and used the left over batter for cake pops.

Next placed our toy volcano on baking pan, and measured increments in 1 inch sections where we carefully arranged army men.

Finally we poured the "lava" into the volcano and watched the fun.

PhotobucketPhotobucket

This experiment was great fun, but it also helped introduced the concept of Viscosity and really helped them understand how lava moves and how land is changed.

After the army men were all dead we too the pan outside and left it in a sunny space. The cake batter hardened. Just like lava would!

Another fun experiment we did was using Jello.
Just make a jello mold. Place the jiggly thing on a flat surface(we used a pan) then the kiddos stacked two large blocks and we placed the pan on top. They took turns moving the large blocks back and forth to demonstrate the movements of the plates. The jello shook and moved and we discussed what would happen if the "mountain" was made of something else and what they thought would happen.

Then we had a snack.

I love projects that can double as food preparation!

To tie this unit up Little Man created a book on Volcanoes using a three pronged folder and manilla paper.

He created a brochure on volcanoes drawing different examples including geysers that went into the folder. Then drew and labeled diagrams of Volcanoes and the Earth. After the fun stuff he made a list of fast facts.

PhotobucketPhotobucket

Friday, March 2, 2012

Happy Birthday Dr. Seuss!

Happy 108th Birthday Dr. Seuss!
In honor of perhaps the greatest children's author and illustrator, today we read all our favorite Seuss classics. I started to list them all but then it took us like 4 hours to read them all and would take several paragraphs to list. We really like our Seuss.

After reading we flipped through the books looking for some cool pictures, you see, our playroom is pretty much a gigantic mural of Dr. Seuss. We had a wall with a space. Now We don't.

PhotobucketPhotobucket


And what is a birthday party without sweets and hats? Chocolate Chip cookies with red and pink swirly chips in a whimsical Seuss manner, and cat ear head bands.
The head bands were truly easy. All you need is black construction paper, pink crayons, glue and scissors.

While we worked we had rhyme battles! The person who could come up with the most rhyming words, real or made up, won. And the Grand Prize? The first cookie, fresh from the oven. Yum!

To make two hats cut one standard sheet of construction paper into 4 strips. Next Cut triangles from another sheet. Color pink triangles onto the black triangles. Glue two strips together long ways to make a circle. Be sure to size it right so it will fit your young'un. Allow it to set for a few minutes before gluing on the triangles. And Tada! Kitty ears!!

And don't forget everyone must have Green Eggs and Ham for dinner tonight!

For information on the man himself here is a link to his biography

http://www.biography.com/people/dr-seuss-9479638

Thursday, March 1, 2012

Taste The Rainbow

We read "What Makes a Rainbow?" The Middle Man, The Wee Man and I. The Middle Man is at a stage where the more colorful something is the better. This has lead to Tye-dying and painting of course, but I decided to try and find some more unique takes on the color experiments.

We mixed food coloring and water using primary colors to make as many shades and colors as we could.

Here are some of the activities that the boys found the most entertaining;
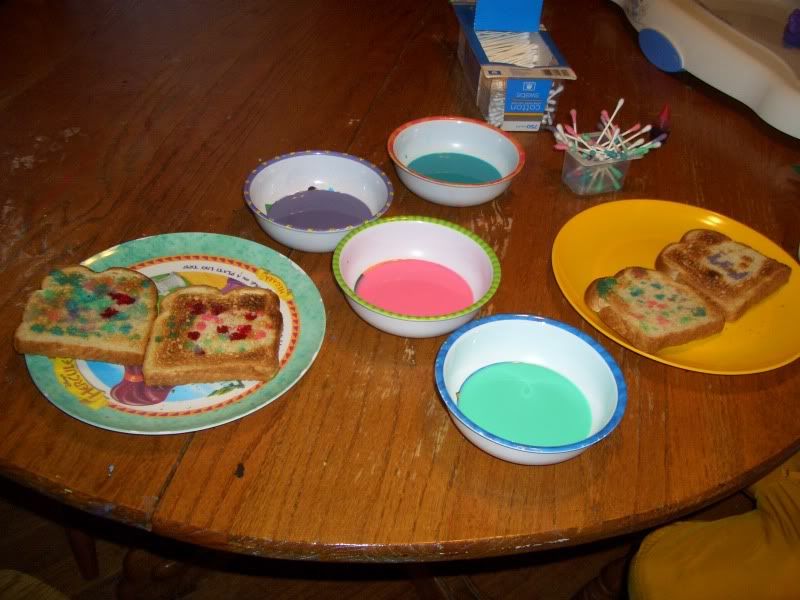
Painted Bread

Need: Toast, Q-tips, milk, bowls, food coloring (Optional: vanilla extract, Cinnamon)

put a few drops of coloring in bowls of milk, i thought it would be fun too to add vanilla and cinnamon as the boys planned to eat their art work. They said it tasted good. I decided to take their word for it.

the kids used the Q-tips (a ton of them so make sure you have a lot) to put letters and make patterns on their toast Photobucket

The next but of fun we had we made rainbow patterns in a bowl.
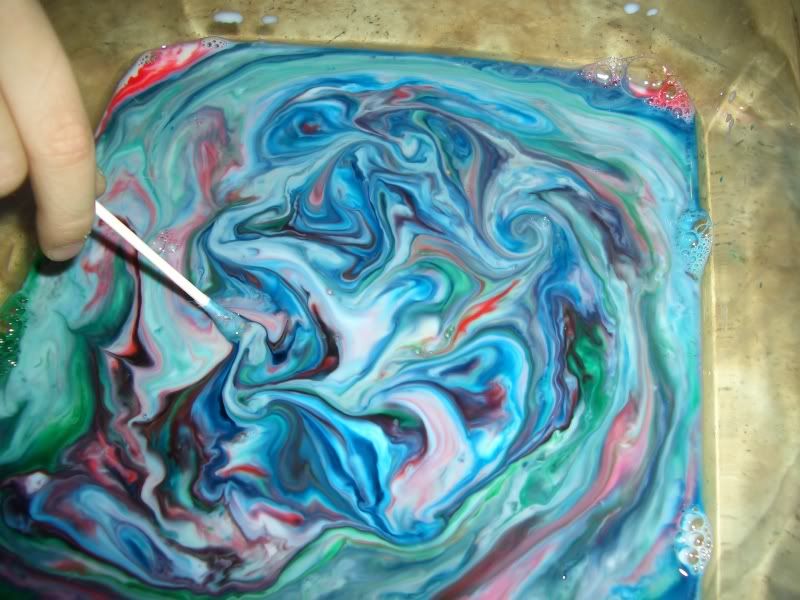
Stained Glass Milk
Need:
milk, soap, food coloring, glass, bowl, Q-Tips

We did several variations of this. We placed milk in a shallow glass container then a few drops of food coloring and dish soap. We changed up how much soap we added and how when. When the colors started mixing they made letters and pictures and swirls. And more swirls...and more until finally the milk left was almost a solid color.

PhotobucketPhotobucket

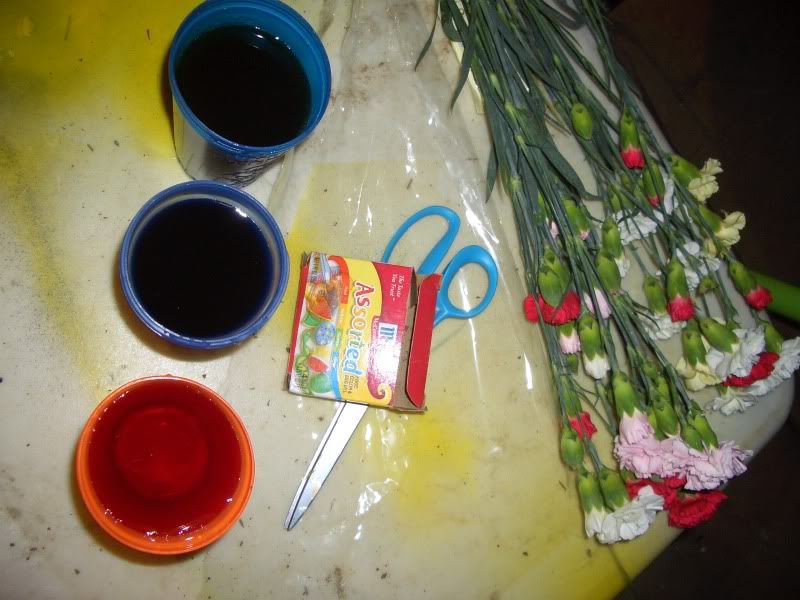
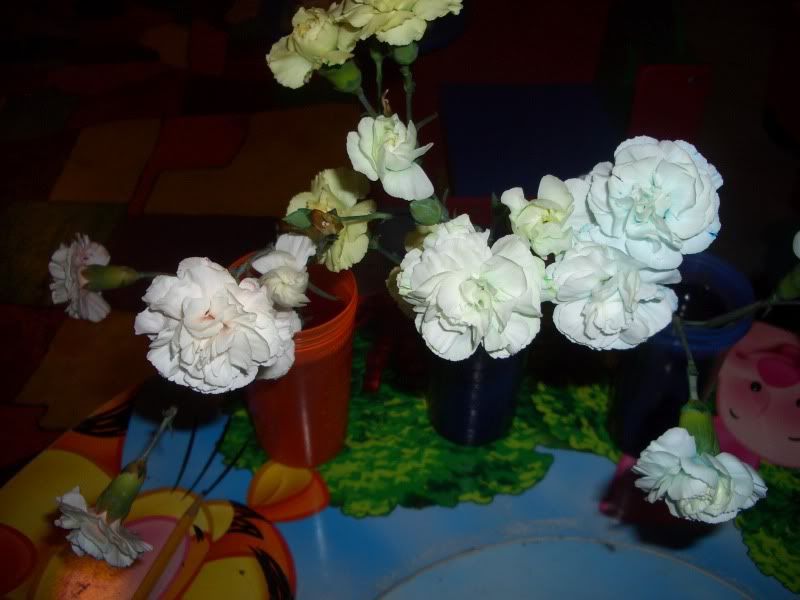
And to finish off the week we are doing Colored Carnations:

Need Carnations (we are using White, Yellow and Light Pink), Water, and Food Coloring

add a TON of red, blue, and green dye to the water. Make sure to cut the stems at an angle, drop in flowers and wait. This takes a while and is best to leave over night.

The kids are very excited to see what they look like in the morning.
PhotobucketPhotobucket

Volcanus Eruptius!

What little boy doesn't love volcanoes? I know all the ones in this house do.

This week has been Volcano crazy!!!!!!!!!!!!!Downright Volcano obsessed and the more they learn the more they love them...

It started off simple. A commercial with a kid building a volcano for a science fair. "Mom, Let's do that!"

So we did. Or at least a version I thought would suit my little man's attention span best.

We covered a two liter bottle with playdoh and using a volcano book made it looks like the real thing (or at least we did from the interpretations from an 8 and 5 year old)

We read the book after we did the volcano. My guys are much more visual and they needed to see and touch while we read.

To make our volcanoes erupt I filled the bottle half with water, added some dish soap, 6 or 7 spoonfuls of baking soda, several drops of food coloring, and then two cups of vinegar... and BOOM VOLCANUS ERUPTIUS! (Can you tell we have watched/read Harry Potter too often?)

PhotobucketPhotobucket

Over the following days we have read about the Changing Earth in our science text, Harcourt Science pages C12-C19) Learned all about the movements of the plates under the earth's surface and my Little Man has started a project on Hawaii. We made a playdo model of the Earth to better understand the different layers (Crust, Mantle, Core).

We melted crayons- and studied about Solids, Liquids, and Gasses. What better way to understand the concept of Molten Iron or Magma?

We have watched the Magic School Bus Blows Its Top and read as many books on the topic as we could find, (Their favorites are Eruption! by Anita Ganeri and Volcanoes Nature's Incredible Fireworks by David L. Harrison). Today He is making a volcano in his world on Minecraft. He says he's making Pompeii...I wonder if the villagers he's making knows their doomed?

I have this feeling that we are going to be Volcanologists ( VUL-can-AHL-uh-gists and yes! that is a word. I didn't know it either until this week.) For a little while. At least until something else catches his attention.

Too Cool For School

There are many negative connotations associated with unschooling, but in my experience this is only from either a lack of understanding, or in a few rare cases, bad experiences.


At it's heart to unschool simply means to follow your child's leads and needs. The unschooling life is not one for the lazy and no matter what form of homeschooling you subscribe to, it is not for the unorganized. Unschooling itself is a mindset. For my family it means we teach our children how to learn. We teach them to find joy in exploring the world. Above all we teach them the skills they need to acquire skills.

And most importantly we have fun.

As the parent of an unschooler you have to learn to let go. You must completly retrain the way your mind works and how you view education. Leaning does not have to come from books, and the best teachers are life and experience. The first year of unschooling begins the day you give birth...perhaps it even begins before that when you are singing and playing with baby through your belly.

As your child grows you sing the alphabet. You point out the pretty birds. You teach them to wave back to the smiling faces. When they become school aged there is no reason this must stop and "formal" education to begin. Five is not a magic number that means a child stops learning through play.

I say all of this now with the firmest belief, but I always didn't feel this way. In college my goal was to become a teacher, a kindergarten teacher to be exact, and I felt passionate about teaching little ones. The first time I heard of the concept of unschooling I was disgusted. How on Earth would a child ever learn to read? To write? How to count money? And how would they learn social skills? I can not help but laugh now. Ten years ago I would be horrified at my family's approach to education.

But since then I have grown some myself, and unschooling has definitely helped me. I have John Holt to thank for my change of heart and mind. I stumbled across some of his philosophy while doing a project for a class on Classroom Management. I went hrmmmm. Then I read more. I'd liked to say I never looked back, but oh did I. After my oldest turned five I did nothing but second, third, and fourth guess myself.

It has been a long journey and it isn't over... not by half.

This is our journey.